First up is the drawing on the illustration board ready to go...

The first thing I did next was spot in all the extreme blacks...

I realised at this point that what would become the (value - dark grey 6/7ish) shadow tones were by going to be way too light to hold up in just overpainted pencil, and I felt that the image would fail if I didn't rectify this problem straight away - so I mixed up a warm reddish brown of the correct value and put this over what were to become the darker (but not black) shadow areas. Which was really easy to do as I had already drawn in where these should be in the pencil. The experiment as I intended failed at this point as I had essentially created a tonal underpainting despite not wanting to. I still really wanted to make the image work though and continued on with painting process...

The next step was to overlay some transparent colour - I used acrylic inks and worked outwards from my focal point taking a warm yellow to yellow green to green to a greeny blue working around the colour wheel and keeping things bold and powerful but harmonious...

Next step was the backgrond, as I had stuck to all warm colours for the foreground (a warm yellow, a warm blue) I chose a cool blue for the background (cool colours recede) and I felt this would make a good contrast...

Edges next! I always call this faze 'edgebusting!' Acrylic paint always leaves hard edges everywhere, It is useful at times and a bain at others, if you want a soft edge in acrylic you have to actively make it soft, I do this by mixing an appropriate transitional tone which will take one colour/area over to another more subtly, you basically then have 3 lines in acrylic, it's a bit of a cheat but the effect is that it looks softer. Hard lines attract attention so only leave them where you want attention attracting!

Next step I faded out the background with a darker blue tone using an airbrush, I don't especially like an airbrushed look to my work though I find as a tool it is very useful (especially when working with acrylic) for dealing with anything 'atmospheric' (layers receeding into depth, nimbus & special lighting effects etc). So if I choose to use the airbrush in a painting I always try to use it as a means to achieve a definite effect 'within' and as a part of the bigger painting process (on top of brushwork/underneath brushwork etc), it plays it's part as a useful tool and is good at it in that respect, I think too much airbrushing can kill a painting, unless it is intended to be an airbrushed painting.

Next I began highlighting areas, opaque acrylic (mostly white, yellow, and other opaque colours as needed) were mixed with the ink to opacify it and this was then used to work onto the transparent underpainting...

More and more highlights are added, this is where you have to make a clear judgement as to how the light would strike the form, and what reflective qualities the object being struck has, whatever judgements you make here have to remain consistent throughout the process.

More highlights...

I got the airbrush out here again and added a slight flaring of the light over the shoulders of the character to try and link the foreground in with the backgound a little.

At this point I was ready to call it finished, but it occured to me that the balance of black, white, and midtoned areas was a bit off - the image needed more shadow definition.

I cut back into the darker areas with a pure black trying to define more clearly the shadow side and then re-softened the edges.

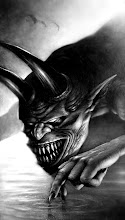
This is what happens when I scan an image - It goes all dull and dark! This almost always happens! (I guess it does to everyone? - If not somebody PLEASE tell me what I'm doing wrong!). So anyhow I run this shadowy form through photoshop and tweak all the levels with the original at hand so I can match it up as best I can, and then add any improvements if necessary. The photographs show the true colours of the original quite accurately above (so you can see what I was aiming at), anyhow then thats it... Done!

Conclusions wise - I guess I really DO have to set out the tones (in paint) soundly in preparation/underpainting, as the pencil even at its darkest value isn't black, and all the other tones are similarly lighter than they seem. Ah well it was definitely worth a go - not to worry, all good fun!
Positives - What I did find was that by having a clear path as to where to put those painted tones it sped up the underpainting/tonal stage up dramatically as I could blast them straight in! I think what I'll try next is drawing in a way that clearly notes where the mid and darks are going to go (figure them all out at pencil stage), and how the light is to hit the form, not an overlaiden 'fully toned' pencil drawing as in this experiment, but definitely somthing with more definitive shadow notations than my regular line drawing method.
More soon! :)
"I have always been delighted at the prospect of a new day, a fresh try, one more start, with perhaps a bit of magic waiting somewhere behind the morning."
- J. B. Priestly